Netty 教程
Netty 简介
基于Netty 版本:4.1.70.Final
当我们打开 Netty 官网,会看到一个赫然的标题。
Netty is an asynchronous event-driven network application framework for rapid development of maintainable high performance protocol servers & clients. Netty 是一个异步事件驱动网络编程框架,用于快速开发可维护的高性能协议服务器和客户端。
从中我们提取一些重点词汇:异步、事件驱动、协议服务器。
没错,这就是 Netty 的特点,基于 Reactor 线程模型异步能力,基于 epoll 处理 IO 的能力,内置了许多协议处理器和编解码器,只需要简单编码就能实现高性能的服务器-客户端应用。
Netty 发展十几年,Java 生态许多高性能的中间件都是用了它,例如:Apache Flink、Apache Spark、Elastic Search 等,这说明了 Netty 是优良网络编程框架。
P.S. 你可以点击这个链接了解使用 Netty 的开源项目 https://netty.io/wiki/related-projects.html
Netty 的优点
那么 Netty 有哪些优点呢?
- 基于 Reactor 模型
- 使用直接内存避免拷贝开销
- 提供了多种协议的编解码器,开箱即用
- 提供了测试工具、内存泄露检测工具等
Netty 支持的协议
单拿协议处理器来说,Netty 实现了以下协议的处理器,做到了开箱即用!
| 协议 | 说明 |
|---|---|
| HTTP/HTTP2/Websocket | / |
| DNS | 域名解析服务 |
| MQTT | 消息队列遥测传输协议,低功耗的消息传输协议,常用在移动设备的消息推送 |
| SMTP | 简单邮件协议 |
| SOCKS | 一种用于穿透内网防火墙的协议,常实现代理服务器 |
| SCTP | 一种基于 TCP、UDP 优点的传输协议,适用于音视频传输,WebRTC 技术就应用了这种协议 |
| STOMP | 一种简单消息传输协议 |
| UDT | 基于 UDP 的可靠传输协议,现在已经废弃 |
相信到这里你已经有些心动了,当你使用 Netty 实现一个 CS 程序时你会不由地感叹 Netty 的强大与便捷。
Netty 的核心组件
- Channel:对应于网络的 Socket,是一个双向管道,即可以写数据又可以读数据。
- EventLoop:事件循环,每一个事件循环仅与一个线程绑定,用来处理 epoll 事件。
- Handler:所有的数据读写、编解码、计算等都在这里进行,可以说它是 Netty 业务逻辑处理等单元。
- Codec:编辑码器,对读取的数据进行解码,对将要发送的数据进行编码,另外它还负责数据压缩和协议转换。
- Pipeline:是 Handler 链的容器,可以说是业务逻辑处理的大动脉,所有的 IO 事件都在这里流转。
- ChannelFeaure:代表 channel 处理的一个结果。
- ChannelHandlerContext:处理器 Handler 的上下文,从中可以获取 Channel,或者进行读写操作关闭链接等操作。
Netty 能用来做什么
世面上有很多中间件使用 Netty 做网络通信,Netty 很擅长这个。如果你想做一个 Websocket 长连接或者 HTTP 服务器,Netty 是一个选择;如果你想实现一个内网穿透工具或者代理工具,Netty 也是一个很好的选择,它支持 SOCKS 协议能进行字节级数据控制。
Netty echo 详解
程序清单
- EchoServer
- EchoServerHandler
- EchoClient
- EchoClientHandler
代码
EchoServer
import io.netty.bootstrap.ServerBootstrap;
import io.netty.channel.*;
import io.netty.channel.nio.NioEventLoopGroup;
import io.netty.channel.socket.SocketChannel;
import io.netty.channel.socket.nio.NioServerSocketChannel;
import io.netty.handler.logging.LogLevel;
import io.netty.handler.logging.LoggingHandler;

import java.net.InetSocketAddress;

/**
 * echo server,接收打印client发送过来的数据,并把数据返回给client
 */
public final class EchoServer {

    static final int PORT = Integer.parseInt(System.getProperty("port", "8007"));

    public static void main(String[] args) throws Exception {

        // 配置服务器
        // 主event loop,负责接受(accept)socket连接
        EventLoopGroup bossGroup = new NioEventLoopGroup(1);
        // 从event loop,负责处理socket的事件
        EventLoopGroup workerGroup = new NioEventLoopGroup();
        // server 的channel处理器
        final EchoServerHandler serverHandler = new EchoServerHandler();
        try {
            // Server引导器(配置器)
            ServerBootstrap b = new ServerBootstrap();
            b.group(bossGroup, workerGroup)
                    .channel(NioServerSocketChannel.class)
                    // 设置ip地址和端口,server默认使用本地ip,也可以通过bind()来设置
                    .localAddress(new InetSocketAddress(PORT))
                    // 配置网络传输参数,例如缓存大小
                    .option(ChannelOption.SO_BACKLOG, 100)
                    // 配置日志打印
                    .handler(new LoggingHandler(LogLevel.INFO))
                    // netty核心组件,pipeline 处理器
                    .childHandler(new ChannelInitializer<SocketChannel>() {
                        @Override
                        public void initChannel(SocketChannel ch) throws Exception {
                            // 通过channel获取管道对象
                            ChannelPipeline pipeline = ch.pipeline();
                            // 通过管道挂在handler
                            pipeline.addLast(serverHandler);
                        }
                    });

            // 绑定设置的断开(PORT),并阻塞(sync)到绑定完成,绑定完成后就开始监听close信号
            ChannelFuture f = b.bind().sync();

            // 阻塞到接收client发过来关闭(close)信号
            f.channel().closeFuture().sync();
            // 当client发过来close信号后,才会执行这里
        } finally {
            // 关闭所有event loop的线程,并关闭内部的线程
            bossGroup.shutdownGracefully();
            workerGroup.shutdownGracefully();
        }
    }

}
EchoServerHandler
import io.netty.buffer.ByteBuf;
import io.netty.buffer.Unpooled;
import io.netty.channel.ChannelHandler.Sharable;
import io.netty.channel.ChannelHandlerContext;
import io.netty.channel.ChannelInboundHandlerAdapter;
import java.nio.charset.StandardCharsets;

/**
 * Handler implementation for the echo server.
 */
@Sharable
public class EchoServerHandler extends ChannelInboundHandlerAdapter {

    /**  第一次建立连接调用 */
    @Override
    public void channelActive(ChannelHandlerContext ctx) throws Exception {
        final char[] chars = "hello client, I am Server.".toCharArray();
        // 建立连接想client发送一句话
        ctx.pipeline().writeAndFlush(Unpooled.copiedBuffer(chars, StandardCharsets.UTF_8));
    }

    /** 客户端发送过来数据调用 */
    @Override
    public void channelRead(ChannelHandlerContext ctx, Object msg) {
        final ByteBuf buf = (ByteBuf) msg;
        String recv = "接收:" + buf.toString(StandardCharsets.UTF_8);
        if(recv.indexOf("exit") != -1){
            ctx.close();
            return;
        }
        System.out.print(recv);
        // 将数据传回客户端
        ctx.write(Unpooled.copiedBuffer(recv.getBytes(StandardCharsets.UTF_8)));
    }

    /** 读取完毕,完成一次读事件 */
    @Override
    public void channelReadComplete(ChannelHandlerContext ctx) {
        // flush - 冲刷数据,flush一次便会触发一次或多次client的read事件,反之server也是
        ctx.flush();
    }

    /** 捕获异常 */
    @Override
    public void exceptionCaught(ChannelHandlerContext ctx, Throwable cause) {
        // 引发异常时关闭连接会
        cause.printStackTrace();
        ctx.close();
    }

}
EchoClient
import io.netty.bootstrap.Bootstrap;
import io.netty.buffer.Unpooled;
import io.netty.channel.*;
import io.netty.channel.nio.NioEventLoopGroup;
import io.netty.channel.socket.SocketChannel;
import io.netty.channel.socket.nio.NioSocketChannel;

import java.nio.charset.StandardCharsets;
import java.util.Scanner;

/**
 * 启动client,可以想server发送消息。server的console可以查看client发送的消息。
 */
public final class EchoClient {

    static final String HOST = System.getProperty("host", "127.0.0.1");
    static final int PORT = Integer.parseInt(System.getProperty("port", "8007"));

    public static void main(String[] args) throws Exception {
        // 配置客户端
        // client工作线程,每一个线程将和一个EventLoop绑定
        EventLoopGroup group = new NioEventLoopGroup();
        try {
            // 客户端引导其
            Bootstrap b = new Bootstrap();
            //配置client启动参数
            b.group(group)
                    // 配置数据通道,不同的数据通道决定了IO的方式,例如Nio开头的是非阻塞IO、Oio的是阻塞IO
                    .channel(NioSocketChannel.class)
                    // 网络传输的参数,例如网络缓存缓存的大小、是否延迟
                    .option(ChannelOption.TCP_NODELAY, true)
                    // 入站、出站处理器
                    // initializer是在入站只执行一次的处理器
                    // 它用来与server建立连接、并在pipeline上挂载编解码处理器、自定义处理器
                    .handler(new ChannelInitializer<SocketChannel>() {
                        @Override
                        public void initChannel(SocketChannel ch) throws Exception {
                            ChannelPipeline p = ch.pipeline();
                            //p.addLast(new LoggingHandler(LogLevel.INFO));
                            p.addLast(new EchoClientHandler());
                        }
                    });

            // 与server建立连接(connect),并阻塞(sync)到连接建立
            ChannelFuture f = b.connect(HOST, PORT).sync();
            // 获取建立的连接
            final Channel clientChannel = f.channel();

            System.out.println("input 'exit' to EXIT.");
            Scanner sc = new Scanner(System.in);
            String str;
            // 读取并向server发送数据
            while (!(str = sc.next()).startsWith("exit")) {
                clientChannel.writeAndFlush(Unpooled.copiedBuffer(str.toCharArray(), StandardCharsets.UTF_8));
            }
            // 想server发送断开连接的信号
            clientChannel.close();
            // 获取关闭连接后的结果(future),并阻塞(sync)到接收到server发过来的断开连接信号
            clientChannel.closeFuture().sync();
        } finally {
            // 关闭所有的EventLoop,并终止内部的线程
            group.shutdownGracefully();
        }
    }
}
EchoClientHandler
import io.netty.buffer.ByteBuf;
import io.netty.buffer.Unpooled;
import io.netty.channel.ChannelHandlerContext;
import io.netty.channel.ChannelInboundHandlerAdapter;

import java.nio.charset.StandardCharsets;

/**
 * client 端 handler
 */
public class EchoClientHandler extends ChannelInboundHandlerAdapter {

    private final ByteBuf firstMessage;

    public EchoClientHandler() {
        firstMessage = Unpooled.copiedBuffer("start data transfer.\n".toCharArray(), StandardCharsets.UTF_8);
    }

    /**
     * 建立连接向server发送一个消息
     */
    @Override
    public void channelActive(ChannelHandlerContext ctx) {
        ctx.writeAndFlush(firstMessage);
    }

    /**
     * client的读事件触发会调用此方法
     */
    @Override
    public void channelRead(ChannelHandlerContext ctx, Object msg) {
        System.out.println("client recv : " + ((ByteBuf) msg).toString(StandardCharsets.UTF_8));
    }

    /**
     * 读取完毕向网络发送数据,flush会触发server的read事件
     */
    @Override
    public void channelReadComplete(ChannelHandlerContext ctx) {
        ctx.flush();
    }

    @Override
    public void exceptionCaught(ChannelHandlerContext ctx, Throwable cause) {
        cause.printStackTrace();
        ctx.close();
    }

}
通过注释能了解 netty 运行的组件和开发模式,但可能还会有些疑问,看下面的问题。
问题
1、为什么 Server 和 Client 使用不同的引导(Bootstrap、ServerBootstrap)
实际上 server 和 client 有很大的不同,client 配置只需要一个连接一个线程就够了,而 server 需要配置多个;channel 也有区别,server 的 channel 一方面与 client 建立连接(accept),另一方面处理 client channel 的读写事件。因为功能的差异,所以配置存在差异,就导致需要不同的引导器配置。
2、为什么 server 有两个线程组(EventLoopGroup),而 client 只有一个
server 是可以只用一个线程组。这是 netty 线程模型的缘故,netty 使用的是 Reactor 线程模型。
3、Future
Future是异步编程常见词汇,它代表了一个结果,这个结果会在未来的某个时刻发生,而功过Future能拿到这个结果。常见的是ChannelFuture,它表示了一个操作(如bind、监听关闭closeFuture)的结果。
4、sync() 方法
这个方法是一个同步方法,会阻塞上个操作,直到满足条件,例如:closeFuture().sync() 会阻塞到接收到关闭连接到信号到来。
Netty ChannelHandler
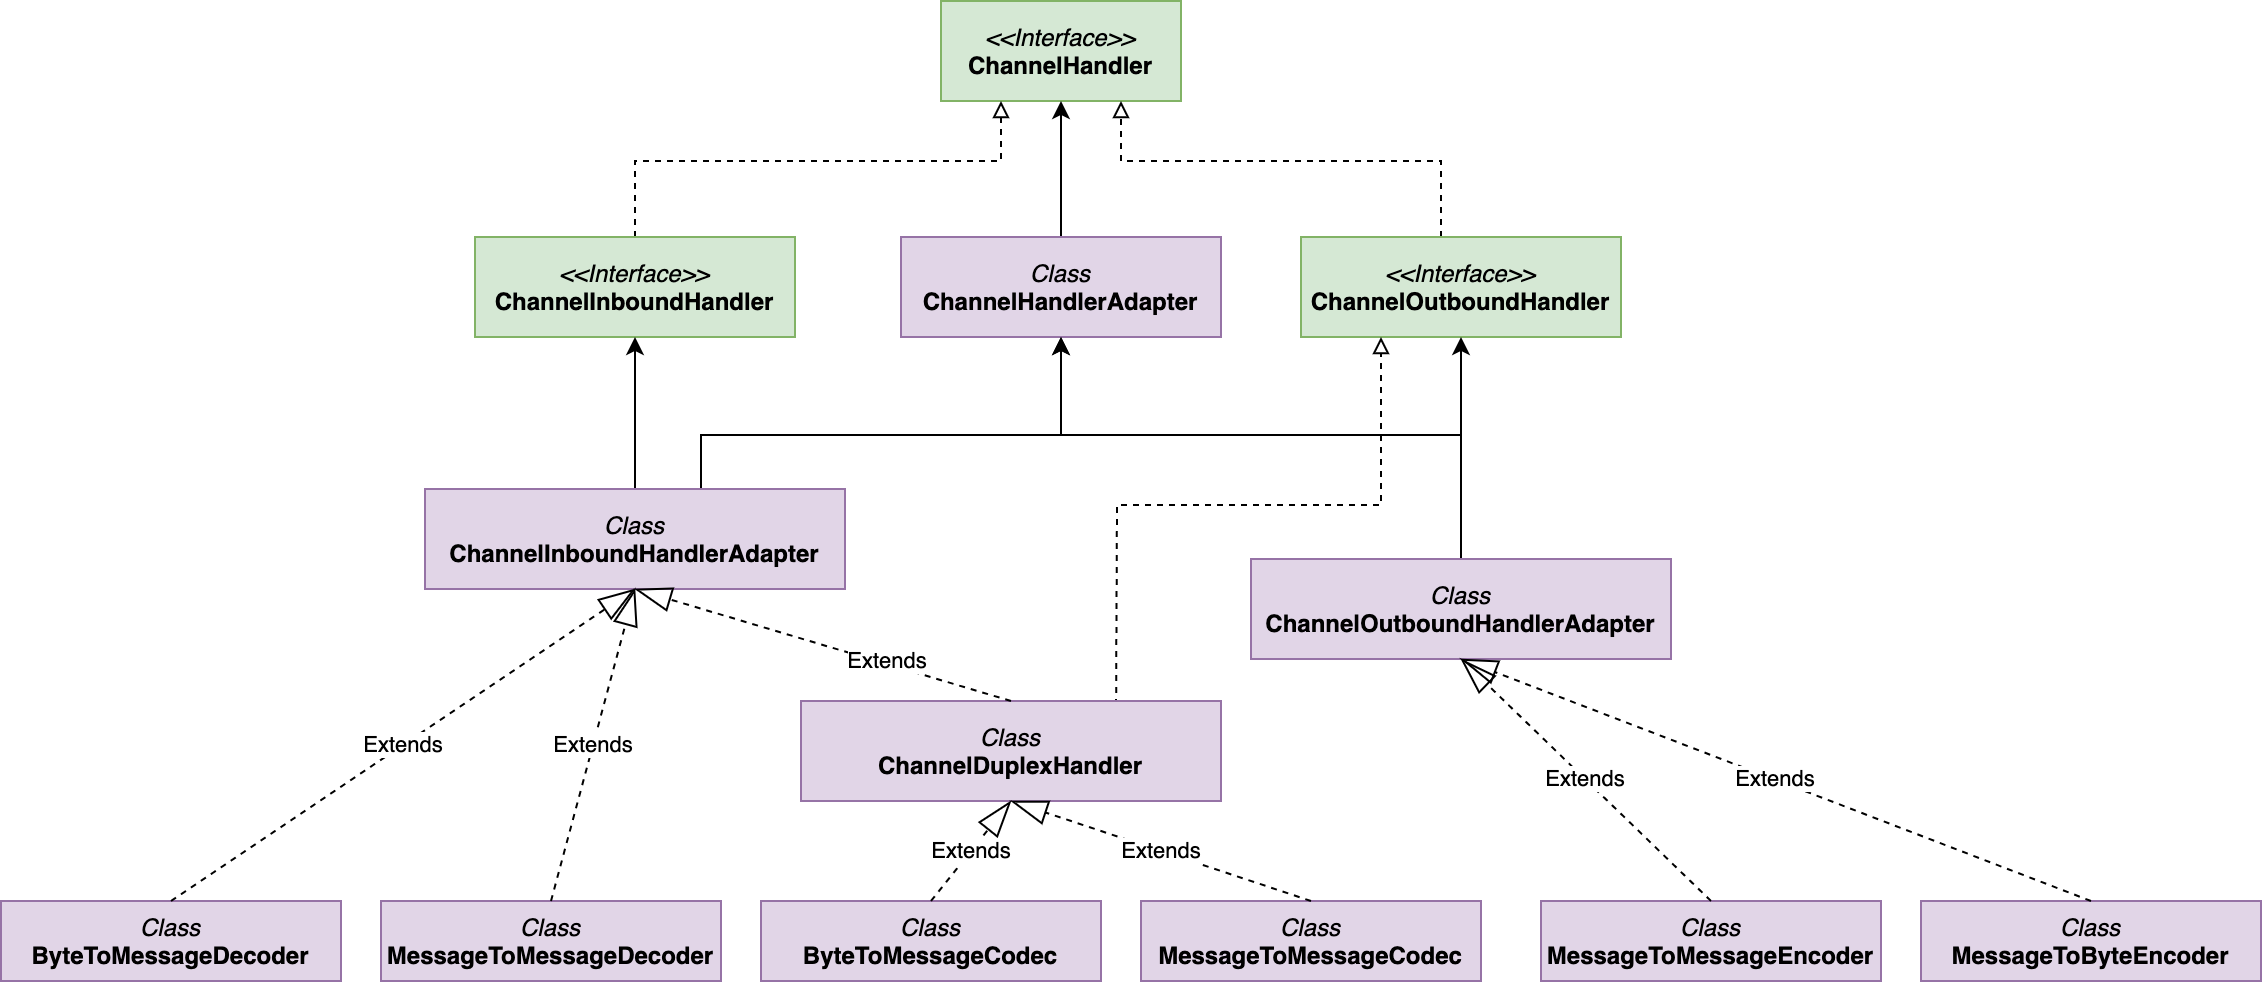
Handler 是处理器,那它处理什么呢?网络中有什么它就做那些处理,常见的有连接的建立,响应读写事件,网络中数据的处理如编码、解码等,这些都输处理器做的,Netty 中的处理器是ChannelHandler接口,所有的处理器都是这个接口的实现。
首先说下 Netty 处理器的定位,它是 Netty 架构网络处理与业务逻辑的解耦,处理器代表了与用户相关的业务逻辑,如数据读取后端计算和发送,而网络连接管理、线程控制、网络事件监听处理都由 Netty 接管,使我们可以更加专注业务逻辑,站在开发的角度使用 Netty 开发接触最多的就是ChannelHandler。
处理器有许多种类,通过以下分类你可以先在脑海中建立一个简单的概念。
处理器分类
- 入站处理器:处理 read 事件的数据,通常是解码操作
- 出站处理器:处理 write 事件的数据,通常是编码操作
- 编解码器:一种专用的数据转换器,例如字节转换为字符串,称之为“解码器”,反之把字符串转换为“字节”称之为“编码器”
- 转换器:复合处理器,把一种数据转换为另一种数据,例如 HTTP1 转换为 HTTP2
ChannelHandler 层次结构

常用类使用
最常使用的是 ChannelInboundHandlerAdapter、ChannelDuplexHandler、ChannelOutboundHandlerAdapter 的实现类,这些类定义了作为不同的类型的方法,例如 InboundHandler 与 OutBoundHandler 定义的方法就有很大的差别。
以入站为代表的方法有 ByteToMessageDecoder、SimpleChannelInboundHandler。
例如ByteToMessageDecoder使用时重写decode方法即可,编码器重写 encode。
      public class SquareDecoder extends {@link ByteToMessageDecoder} {
          @Override
          public void decode(ChannelHandlerContext ctx,  ByteBuf in, List<Object> out)
                  throws  Exception {
              out.add(in.readBytes(in.readableBytes()));
          }
      }
SimpleChannelInboundHandler<T> 使用时重写 channelRead0 方法即可,Adapter 里已经帮我们做好了类型转换。
       public class StringHandler extends SimpleChannelInboundHandler<String> {
            @Override
           protected void channelRead0(ChannelHandlerContext ctx, String message)
                   throws Exception {
               System.out.println(message);
           }
       }
ChannelDuplexHandler 的继承类实现多是进行数据转换,例如:ByteToMessageCodec 将入站的 byte 数据转化为对象,出站时将对象转换为 byte,类似的还有 MessageToMessageCodec,实现两个对象间的转化。
ChannelHandler 的几个注意点
1、执行顺序。按照被添加的顺序执行。
2、共享 Handler 与非共享 Handler。共享的 handler 会帮定到多个 Channel,当 Channel 并行执行时可能存在线程安全问题;非共享 handler 绑定时就会创建一个,Channel 独享不存在线程安全问题。
3、Handler 的 read 会执行多次。当 Channel 中的数据未处理完,上一个 handler 会多次触发下个 handler 的 read 事件。
Netty ChannelPipeline
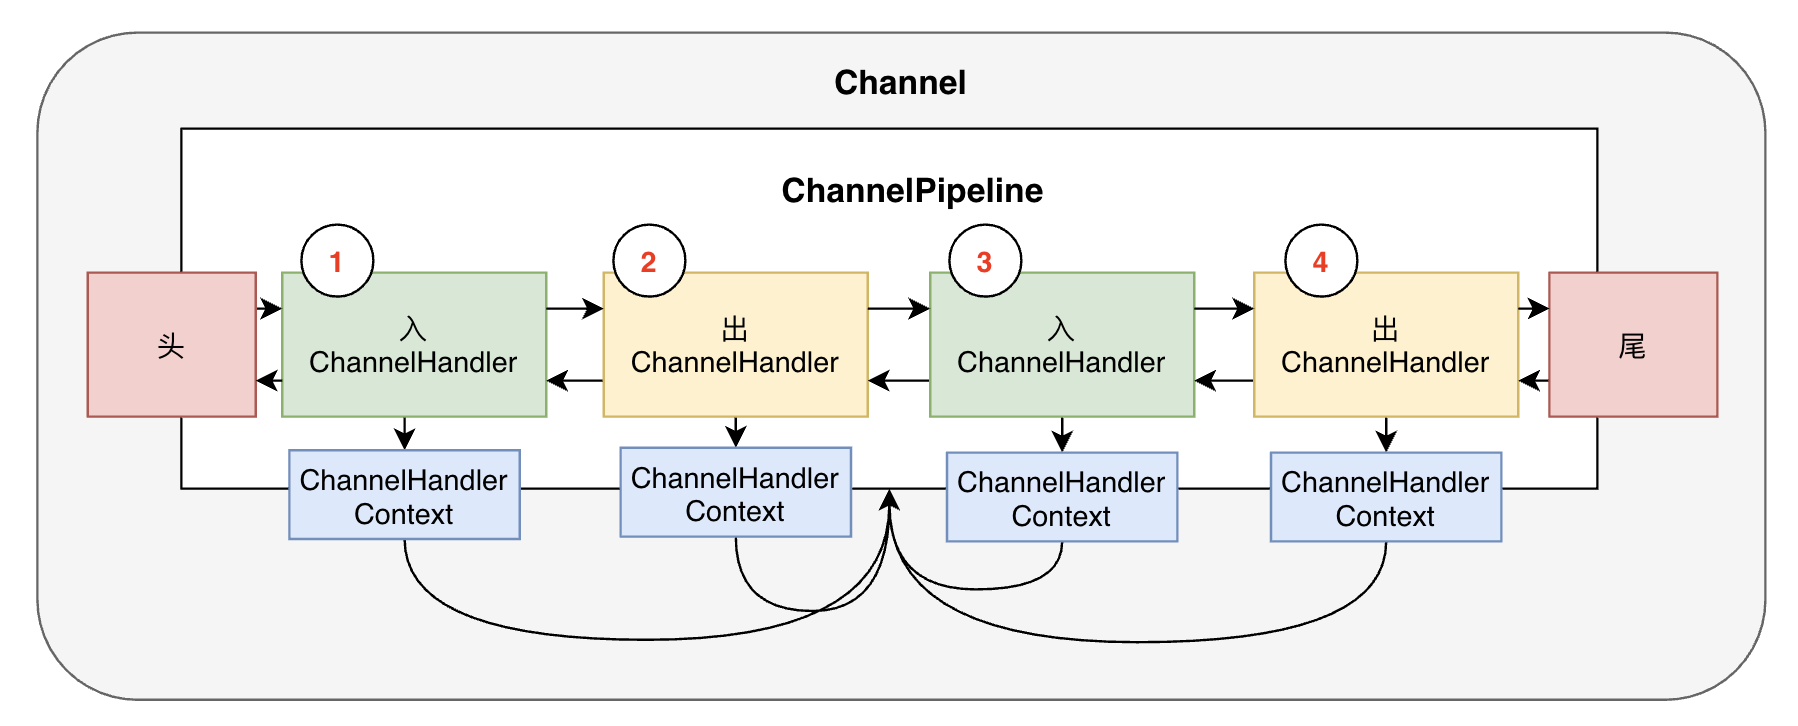
ChannelPipeline 是 ChannelHandler 链的容器,可以说是业务逻辑处理的大动脉,所有的 IO 事件都在这里流转。
ChannelPipeline 负责 ChannelHandler 的编排,其次是传递 Channel 的事件通知。

通过图说明 ChannelPipeline 的要点
1、每一个 ChannelPipeline 和 Channel 唯一绑定
2、ChannelPipeline 是一个带有头和尾的双向管道,事件可以从头到尾流动,也可以从尾到头流动。
3、写 ChannelPipeline 的事件会是从 Pipeline 的头部开始流动事件
4、通常,如果事件从头到尾流动我们称为入站,从尾到头称为出站,入站的第一个 ChannelHandler 的序号是 1,出站的第一个 ChannelHandler 是序号 4。
Netty ChannelHandlerContext
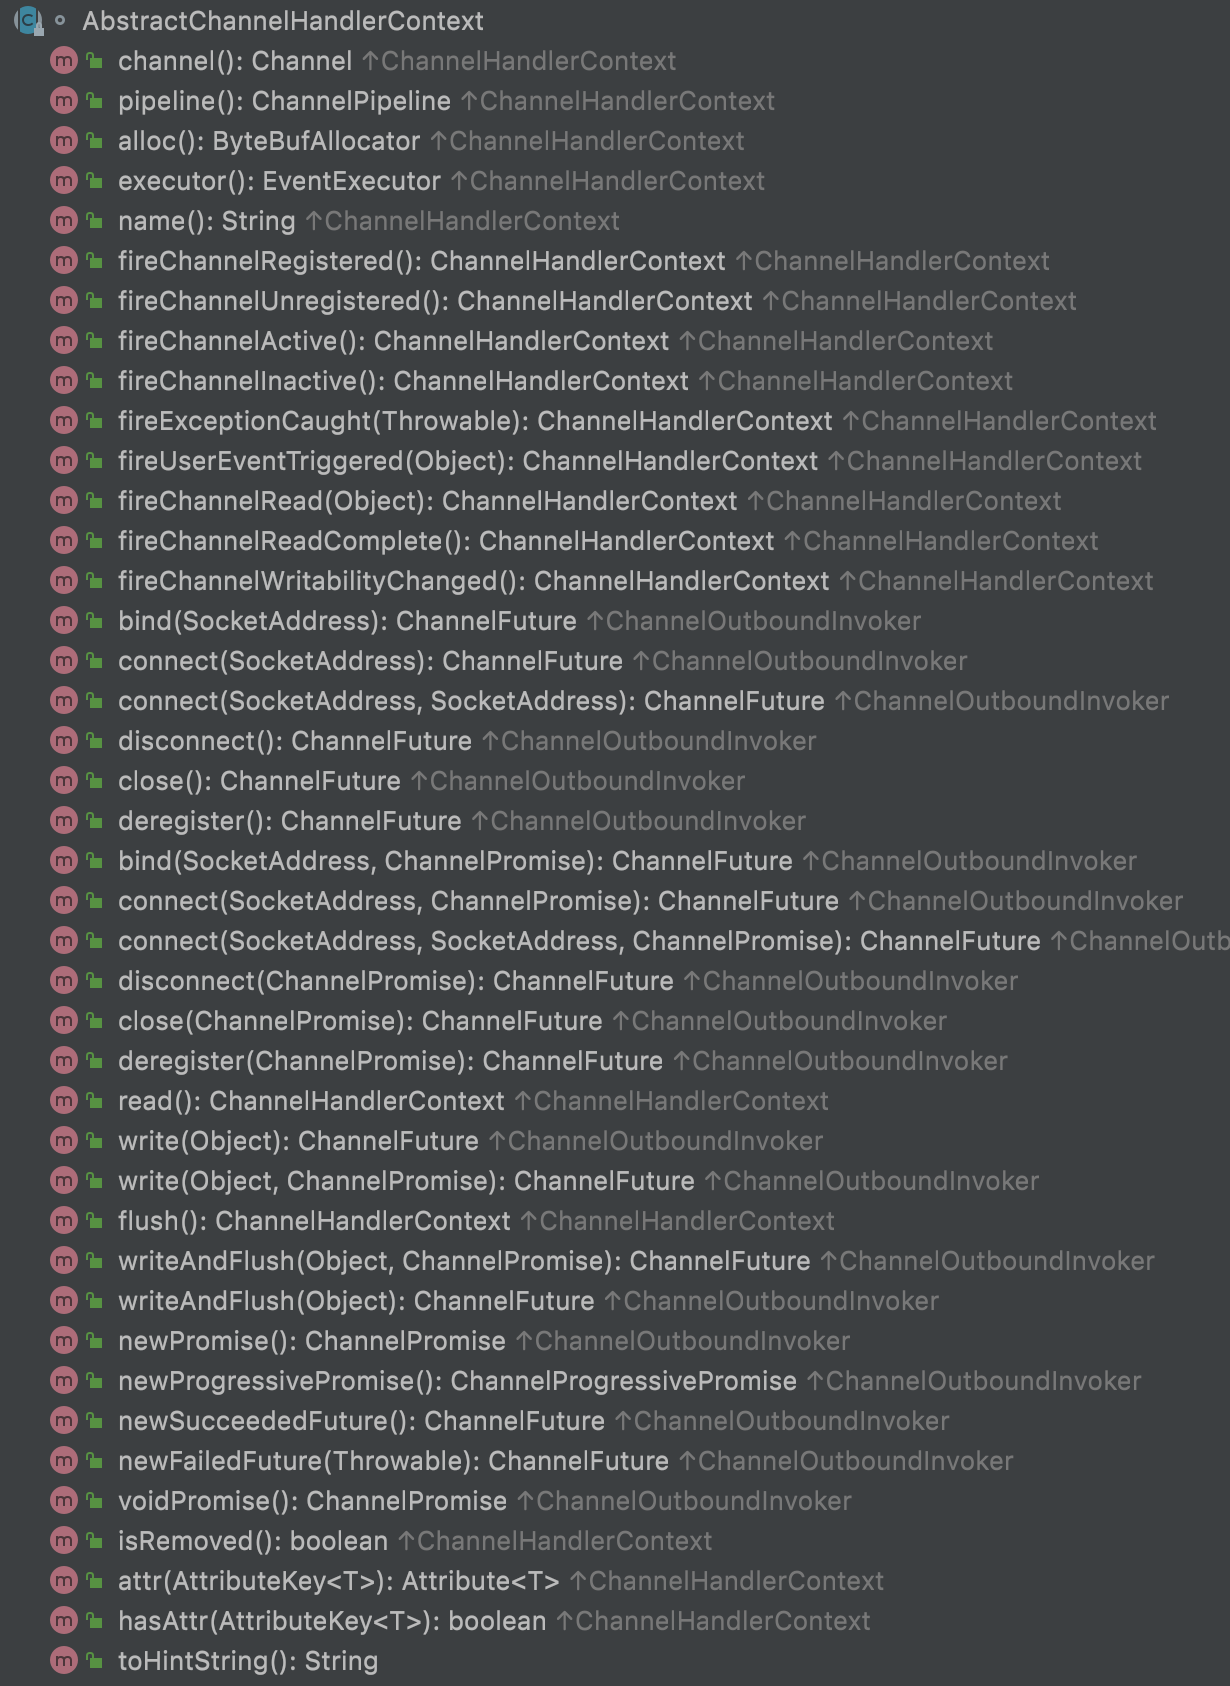
ChannelHandlerContext 的主要功能是关联 ChannelPipeline 与 ChannelHandler 然后管理 ChannelHandler,另一方面是管理和同一个 Pipeline 中的其他 Handler 的交互,也就是 Handler 之间的事件传递。
ChannelHandlerContext 的能力

通过上图里的方法可以看出 ChannelHandlerContext 的能力:
- 获取 ByteBuf 分配器
- 获取绑定的 Channel
- 获取绑定的 Pipeline
- 进行事件通知,以
fire*开头的方法 - 连接管理(
bind、connect、disconnect) - 数据读写(
write、wiriteAndFlush、read)
ChannelHandlerContext 与 Channel、ChannelPipeline 的关系

说明:
- 每一个 ChannelHandlerContext 与一个 ChannelHandler 绑定,一旦关联不会改变,因此缓存 ChannelHandlerConntext 是安全的
- 每一个 ChannelHandlerContext 也与一个 ChannelPipeline 关联,关联后不会改变
- 使用 ChannelHandlerContext 的方法触发的事件从下一个节点流转,而使用 Pipeline、Channel 产生的事件从 pipeline 头部流转。
特殊情况:由于 ChannelHandler 可以是共享的,也就是说可以和多个 Pipeline 关联,此时 ChannelHandler 对于每一个关联的 Pipeline 都创建一个 ChannelHandlerContext。
ChannelHandlerContext 应用
- 缓存起来,在其他方法或线程中使用(因为 ChannelHandlerContext 的绑定是不变的可以放心使用)
- 控制 pipeline,实现协议的切换
Netty 异常处理
异常处理在任何系统中都是重要的组成部分,Netty 的异常处理是通过在 ChannelHandler 中重写 exceptionCaught 方法来实现,这篇文章聚焦于此。
异常处理方式
1、捕获异常处理
    public static class InboundHandler extends ChannelInboundHandlerAdapter {
        @Override
        public void exceptionCaught(ChannelHandlerContext ctx, Throwable cause) throws Exception {
            // 处理异常
            System.err.println(this.getClass().getSimpleName() + " ---- " + cause.getMessage());
            // 向下一个handler传递异常
            ctx.fireExceptionCaught(cause);
        }
    }
P.S. 传递异常将从下个 handler 一直往后传递,不会跳过 OutboundHandler。
2、通过监听 Funture、Promise 处理
1)在调研write、writeAndFlush可以获得得到 ChannelFeature,进而可以监听执行结果是否成功、异常。通常在 InboundHandler 中使用。
            ctx.executor().schedule(()->{
                channelFuture.addListener(new ChannelFutureListener() {
                    @Override
                    public void operationComplete(ChannelFuture future) throws Exception {
                        System.out.println("writeAndFlush done.");
                        if(future.isSuccess()){
                            System.out.println("send success.");
                        }else{
                       		// 处理异常
                            System.out.println("send fail!");
                        }
                    }
                });
            }, 0, TimeUnit.SECONDS);
2)在 OutboundHandler 中,write 方法的入参会带有个Promise参数,通过 Promise 对象可以处理异常,处理后将通知之前的 handler。使用时通过setSuccess、setFailure设置。
源码分析
1、是谁触发 exceptionCaught 方法
主要是 AbstractChannelhandlerContext#invokeExceptionCaught 方法。
    private void invokeExceptionCaught(final Throwable cause) {
        if (invokeHandler()) {
            try {
                //
                handler().exceptionCaught(this, cause);
            } catch (Throwable error) {
                if (logger.isDebugEnabled()) {
                    logger.debug(
                        "An exception {}" +
                        "was thrown by a user handler's exceptionCaught() " +
                        "method while handling the following exception:",
                        ThrowableUtil.stackTraceToString(error), cause);
                } else if (logger.isWarnEnabled()) {
                    logger.warn(
                        "An exception '{}' [enable DEBUG level for full stacktrace] " +
                        "was thrown by a user handler's exceptionCaught() " +
                        "method while handling the following exception:", error, cause);
                }
            }
        } else {
            fireExceptionCaught(cause);
        }
    }
当 channel 触发事件调用 invokeChannelActive、invokeChannelRead 过程中出现异常调用 invokeExceptionCaught。
    private void invokeChannelActive() {
        if (invokeHandler()) {
            try {
                ((ChannelInboundHandler) handler()).channelInactive(this);
            } catch (Throwable t) {
            	// 处理异常
                invokeExceptionCaught(t);
            }
        } else {
            fireChannelInactive();
        }
    }

    private void invokeChannelRead(Object msg) {
        if (invokeHandler()) {
            try {
                ((ChannelInboundHandler) handler()).channelRead(this, msg);
            } catch (Throwable t) {
            	// 处理异常
                invokeExceptionCaught(t);
            }
        } else {
            fireChannelRead(msg);
        }
    }
2、如果我们创建的 Handler 不处理异常,那么会由 Pipeline 中名为tail 的 ChannelHandlerContext 来捕获异常并打印。
可以看到 DefaultChannelPipeline 中有两个内部类:TailContext、HeadContext,最后的异常就是被 TailContext 的实力tail处理的,可以看到 onUnhandledInboundException 方法中使用 warn 级别输出了异常信息。
   // A special catch-all handler that handles both bytes and messages.
    final class TailContext extends AbstractChannelHandlerContext implements ChannelInboundHandler {

        TailContext(DefaultChannelPipeline pipeline) {
            super(pipeline, null, TAIL_NAME, TailContext.class);
            setAddComplete();
        }

        @Override
        public void userEventTriggered(ChannelHandlerContext ctx, Object evt) {
            onUnhandledInboundUserEventTriggered(evt);
        }

        @Override
        public void exceptionCaught(ChannelHandlerContext ctx, Throwable cause) {
            // 处理最后的异常,方法如下
            onUnhandledInboundException(cause);
        }
        // 省略...
    }

    /**
     * 处理最后的异常
     * Called once a {@link Throwable} hit the end of the {@link ChannelPipeline} without been handled by the user
     * in {@link ChannelHandler#exceptionCaught(ChannelHandlerContext, Throwable)}.
     */
    protected void onUnhandledInboundException(Throwable cause) {
        try {
            logger.warn(
                    "An exceptionCaught() event was fired, and it reached at the tail of the pipeline. " +
                            "It usually means the last handler in the pipeline did not handle the exception.",
                    cause);
        } finally {
            ReferenceCountUtil.release(cause);
        }
    }

    final class HeadContext extends AbstractChannelHandlerContext
            implements ChannelOutboundHandler, ChannelInboundHandler {

        private final Unsafe unsafe;

        HeadContext(DefaultChannelPipeline pipeline) {
            super(pipeline, null, HEAD_NAME, HeadContext.class);
            unsafe = pipeline.channel().unsafe();
            setAddComplete();
        }

        @Override
        public void exceptionCaught(ChannelHandlerContext ctx, Throwable cause) {
            ctx.fireExceptionCaught(cause);
        }
        // 省略...
    }
Netty EventLoop
EventLoop 是 Netty 的工作线程,EventLoop 是单线程的,每一个 EventLoop 永远只和一个 Java 线程绑定,这使得 EventLoop 处理读写事件是线程安全的(非共享 Handler)。
Netty 版本:4.1.70.Final
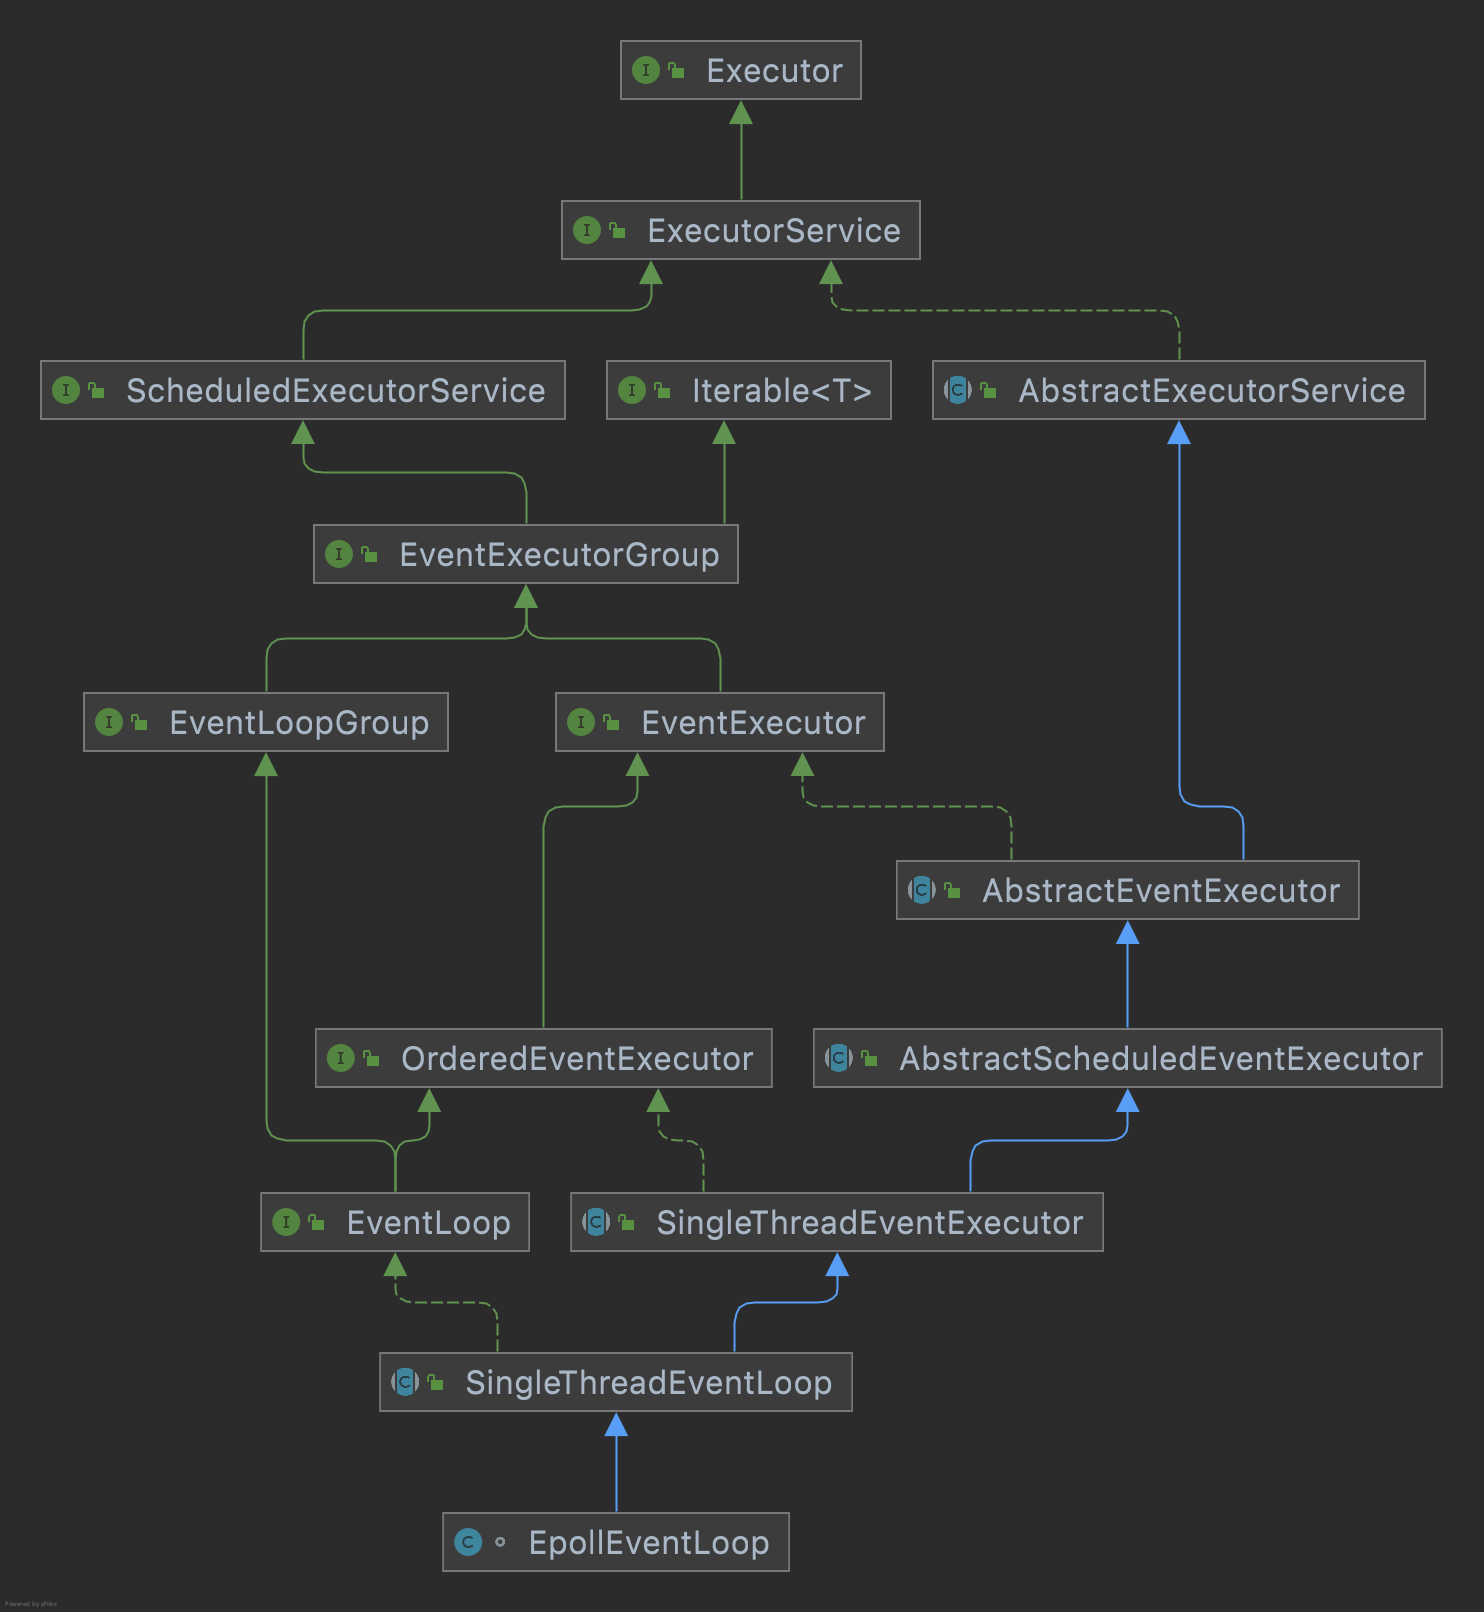
EventLoop 类结构

无论是 EpollEventLoop、NioEventLoop、KQueueEventLoop 都是直接接触 SingleThreadEventLoop 实现的,这个类也再次验证了 EventLoop 是单线程的。
类、接口主要作用
| 名字 | 类型 | 作用 |
|---|---|---|
| Executor | 接口 | 主要定义一个可执行的 execute 方法 |
| ExecutorService | 接口 | 定义了对任务(Task)的控制方法,如提交(submit)、结束(shutdown)和状态方法(isShutdown)等 |
| ScheduledExecutorService | 接口 | 定义了定时类任务提交方法,特点是方法入参须传入时间和时间单位 |
| AbstractExecutorService | 抽象类 | 默认实现了 ExecutorService 的方法 |
| EventExecutorGroup | 接口 | 定义了组 Executor 的操作方法,核心方法是 next 用于返回一个组管理的 Executor。 |
| EventLoopGroup | 接口 | 特殊的 EventExecutorGroup,允许注册 Channel,用于选择 Channel |
| EventExecutor | 接口 | 定义了一些方法,检测线程是否在 EventLoop 中运行 |
| AbstractEventExecutor | 抽象类 | 默认 EventExecutor 接口的实现 |
| AbstractScheduledEventExecutor | 抽象类 | 支持定时任务的 EventExecutor 接口的默认实现 |
| SingleThreadEventExecutor | 抽象类 | 单线程 EventExecutor 的默认实现,单线程 Executor 基类 |
| EventLoop | 接口 | 定义获取父 EventLoop 的方法 parent |
| SingleThreadEventLoop | 抽象类 | EventLoop 的抽象基类,它在单个线程中执行所有提交的任务。 |
| NioEventLoop | 类 | 聚合 Nio Selector 对象的类 |
| EpollEventLoop | 类 | 聚合 Epoll fd、Epoll event 的类 |
EventLoop 核心源码分析
AbstractScheduledEventExecutor
ScheduledEventExecutor 的核心功能是创建执行执行定时任务,这些功能对应的方法是:
public ScheduledFuture<?> schedule(Runnable command, long delay, TimeUnit unit)
public <V> ScheduledFuture<V> schedule(Callable<V> callable, long delay, TimeUnit unit)
public ScheduledFuture<?> scheduleAtFixedRate(Runnable command, long initialDelay, long period, TimeUnit unit)
public ScheduledFuture<?> scheduleWithFixedDelay(Runnable command, long initialDelay, long delay, TimeUnit unit)
上边的这些方法最后都会调用一个私有的schedule方法,这个方法是 ScheduledEventExecutor 的核心。
    /**
     * 核心方法,所有暴露的schedule方法最后都调用此方法
     * @param task 可执行的对象(实现Runnable)且具有返回值(实现Future)
     * @return task执行结果,可获取执行结果(success/failure),可以监听状态
     */
    private <V> ScheduledFuture<V> schedule(final ScheduledFutureTask<V> task) {
        // 判断在哪里创建(schedule)定时任务
        if (inEventLoop()) {
            // 在EventLoop线程中
            // 如果是在EventLoop(handler执行上下文)中创建的定时任务,就放到任务执行队列中
            scheduleFromEventLoop(task);
        } else {
            // 在外部线程 e.g. main线程调用schedule创建定时任务

            // 截止时间 (当前 - ScheduleFutureTask创建时间)
            final long deadlineNanos = task.deadlineNanos();
            // 任务提交前回调判断,true 立即执行任务,false 延迟执行
            if (beforeScheduledTaskSubmitted(deadlineNanos)) {
                // execute表示调用执行(立即run),是个未实现的方法,未来由子类实现,由父类调用
                execute(task);
            } else {
                // 在不重写父类lazyExecute时默认仍然使用当前EventLoop线程执行
                lazyExecute(task);
                // 任务提交之后回调,方法返回true唤醒当前EventLoop线程,false不唤醒
                if (afterScheduledTaskSubmitted(deadlineNanos)) {
                    // 官方解释是为了避免线程竞争
                    // WAKEUP_TASK这个任务run方法没有执行的语句,使线程保持活跃(等待->可执行,持有CPU资源),避免线程竞争CPU开销
                    execute(WAKEUP_TASK);
                }
            }
        }
        return task;
    }
    // 在EventLoop中创建的定时任务放在taskQueue, 方便EventGroup调度
	final void scheduleFromEventLoop(final ScheduledFutureTask<?> task) {
        // nextTaskId a long and so there is no chance it will overflow back to 0
        scheduledTaskQueue().add(task.setId(++nextTaskId));
    }
SingleThreadEventExecutor
这个类主要实现了任务的启动、执行、结束。
private void doStartThread();
// 执行一个任务
public void execute(Runnable task);
// 关闭
public Future<?> shutdownGracefully(long quietPeriod, long timeout, TimeUnit unit);
SingleThreadEventLoop
SingleThreadEventLoop 是 EventLoop 的抽象基类,且继承了 SingleThreadEventExecutor,这个类的主要作用是通过构造器组装父类需要的属性。
NioEventLoop
这个类继承了 SingleThreadEventLoop,内部聚合 Nio Selector,作用是将 Channel 注册到 Selector 并且在事件循环中对这些进行多路复用。
    /**
     * The NIO {@link Selector}.
     */
    private Selector selector;
    private Selector unwrappedSelector;
    private SelectedSelectionKeySet selectedKeys;
EOF